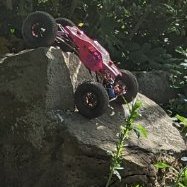
Popular Post Hell horn. Posted May 4, 2022 Popular Post Share Posted May 4, 2022 (edited) As some of you know I have been working on a sporty chassis idea for some time. About 2 years in fact. Well it's finally at the end stage of development. The new 3d printer has allowed me to finish the parts I couldn't make before. I have pushed myself to work it all out. It's been brilliant fun. Stressful at times. And almost gave up a few times. But we are very close to it being finished now. Next step is get it out and tested. See how it handles on the rocks. I have a few more ideas for parts I want to design next. As for the name. Herja is a valkyrie in Norse mythology. her name means "(She who) devestates". It can also mean someone who cushes rocks. My version of this build is built around an ar60 front axle and a modded rear ar44. A dlux hamburger gearbox. I plan to make it work with a wider range of parts at a later date. Edited October 18, 2022 by Hell horn. 8 Quote Link to comment Share on other sites More sharing options...
Stormbringer Posted May 5, 2022 Share Posted May 5, 2022 Wow youve done good job with that and be interesting seeing how it performs 1 1 Quote Link to comment Share on other sites More sharing options...
Hell horn. Posted May 5, 2022 Author Share Posted May 5, 2022 Thanks dude. Taken me long enough ha. Will try and get some videos of it on the rocks asap. 3 Quote Link to comment Share on other sites More sharing options...
Shergar Posted May 5, 2022 Share Posted May 5, 2022 I’m really intrigued to know how it performs too, how long till it gets its first test? 1 Quote Link to comment Share on other sites More sharing options...
Hell horn. Posted May 5, 2022 Author Share Posted May 5, 2022 Fingers crossed Saturday. If not I'm aiming for Tuesday or Wednesday next week. Family and work tend to get in the way a lot. Lol 2 Quote Link to comment Share on other sites More sharing options...
Redback Posted May 5, 2022 Share Posted May 5, 2022 Looks awesome, looking forward to seeing the running vid. Are the carbon sides, custom made / cut also? What are the printed parts made of pla or petg? 1 Quote Link to comment Share on other sites More sharing options...
Hell horn. Posted May 5, 2022 Author Share Posted May 5, 2022 Carbon parts are all custom cut for me. Designed by me. Printed parts are all pla tough for now. Planning to try out some other types of once I have them. 1 Quote Link to comment Share on other sites More sharing options...
Hell horn. Posted May 6, 2022 Author Share Posted May 6, 2022 I took a built chassis to work this morning to show my boss. And decided to see how much the chassis weighs. A massive 63 grams. A 5th dimension sucker punch is around 84. I could get that lower with some titanium bolts too. I think I could hit sub 50 if wanted. 1 Quote Link to comment Share on other sites More sharing options...
Shergar Posted May 6, 2022 Share Posted May 6, 2022 Would carbon tube upper links be too weak? 1 Quote Link to comment Share on other sites More sharing options...
Hell horn. Posted May 6, 2022 Author Share Posted May 6, 2022 They could be a possibility. But they will add weight over this set up. If I could find some 60mm me tubes to try I could test them. I'd need 6 of them. So it would add a good chunk to the cost of the chassis too 1 Quote Link to comment Share on other sites More sharing options...
Hell horn. Posted May 6, 2022 Author Share Posted May 6, 2022 Miss read that the first time. Thought you ment chassis brace. As for links. I made some before. Didn't really save any weight and flxed to much. 1 1 Quote Link to comment Share on other sites More sharing options...
Hell horn. Posted May 7, 2022 Author Share Posted May 7, 2022 The film is after it lost a drive shaft pin. So I had to fix it with a bent m5 bolt. It's then Snapped the rear link riser. Had to go back to the stock link point. So it has a horrific drive shaft angle. I was filming and driving together. And trying to keep a 5 year old under control. I think it did really well. It's still not set up fully yet. I really can't drive and film at the same time. Not after my stroke unfortunately. So it's not the best. The car climbed over stuff really well. Until it all went wrong lol. Need to set the car up better and try again 1 Quote Link to comment Share on other sites More sharing options...
Hell horn. Posted May 7, 2022 Author Share Posted May 7, 2022 Well video is way to big to upload on here. So pm me it you want to see it 1 Quote Link to comment Share on other sites More sharing options...
Popular Post Hell horn. Posted May 8, 2022 Author Popular Post Share Posted May 8, 2022 Made some more progress on the wheels. First finished set going on my car today or tomorrow. Then see how they stand up to some abuse on Tuesday. Need to make one tiny adjustment to the 3d printed part. But that's a 30 second job tonight by 5 Quote Link to comment Share on other sites More sharing options...
Popular Post Hell horn. Posted May 10, 2022 Author Popular Post Share Posted May 10, 2022 (edited) So last night I set the links up better and today took the car back to the park with the rock garden. Gave the car a good bashing on the rocks. It did brilliantly. Climbed over stuff with ease. I am more then happy with the set up now. Just need a few little bits to finish it off. One or 2 weights in rear wheels to help with grip and dropping off edges. And get a better throttle curve on the br mini. As it currently isn't brilliant. No video as unfortunately I'm on my own and didn't bring anything to hold the phone to film it. My bad. Very very little torque twist in the back. Suspension flows over rocks well. And now I vented the tyres they do work well. This rock doesn't have much grip at all. Years of people walking on them have made them nice and smooth. All my printed parts held up really well. Nothing split or cracked even with a very low infill amount. The wheels held the tyres fast. Even when it was pushed into an overhang rock and the car wouldn't move. They didn't spin at all. So again. I'm happy they are right. In a few weeks I will have 2 more full chassis built to be tested. Pm me if your interested in testing one for me. Will need to sort an agreement out with you if you do. Edited May 19, 2022 by Hell horn. 5 Quote Link to comment Share on other sites More sharing options...
Hell horn. Posted May 12, 2022 Author Share Posted May 12, 2022 After a lot of rude words. 4 different test items. And a lot of messing about and a nice headache my pro44 link riser is finished. Not the most tidy item. But it's good enough for now. Time to print a final one off and get it fitted. Also sorted the weight hangers last night. Added 40mm to the axle. One more job sorted off the list. Have already fixed the issue with the 2 small holes in the weight hangers. Moved them slightly. Getting some slugs made for it next week. 3 Quote Link to comment Share on other sites More sharing options...
Hell horn. Posted May 14, 2022 Author Share Posted May 14, 2022 Got the herja out at breakheart quarry in dursley this morning with a group of people. about 20 if us with all sorts of cars. A total of around 100 gates set up accros the site. The herja did brilliantly. Hit everything and didn't have any issues climbing over it all. No issues with the car. Nothing Broken or fell off. Was a brilliant test for it. No videos sorry. I was having to much fun to remember ha. Next time definitely get have some. 1 Quote Link to comment Share on other sites More sharing options...
Hell horn. Posted May 14, 2022 Author Share Posted May 14, 2022 Managed to get a picture of a mate. Unfortunately not very good. Ha. 2 Quote Link to comment Share on other sites More sharing options...
Hell horn. Posted May 16, 2022 Author Share Posted May 16, 2022 A few orders placed for my chassis. Helping a friend build a sporty with my chassis and some spare parts. He is super excited to be building one. I also have 2 more chassis sets on order to put together if anyone is interested in. Quote Link to comment Share on other sites More sharing options...
Hell horn. Posted May 19, 2022 Author Share Posted May 19, 2022 The ar60 servo mount is done. And started work on a set of cheap glue on 2.2 wheels not finished yet. But a basic idea for a set anyway. 3 Quote Link to comment Share on other sites More sharing options...
Hell horn. Posted May 22, 2022 Author Share Posted May 22, 2022 Rear hangers sorted. Now have 4 slots for the slugs. So wth brass it holds 80 grams across the 2 sides. 2 Quote Link to comment Share on other sites More sharing options...
Hell horn. Posted May 24, 2022 Author Share Posted May 24, 2022 So I decided to have a go at making some weight hanger wheels for my herja project. Almost sorted now. Just a little adjustment and they will be done. 1 Quote Link to comment Share on other sites More sharing options...
Shergar Posted May 24, 2022 Share Posted May 24, 2022 Hey Hell Horn could you explain how the weight hanger wheels work please? Quote Link to comment Share on other sites More sharing options...
Hell horn. Posted May 24, 2022 Author Share Posted May 24, 2022 So with the hangers. It places a set of weights below the axle hight of the car. Making its cog as low as possible and putting weight right where you want it most. The tyres. And. It having the weight high up. So picture of the full car is a single weight hanger for a stock beadlock style wheel. It drops a small amount of weights just below the axle. This helps wth cog a little. The extreme version is the picture of parts of a wheel. This version cuts out a section of the wheel and gives space to hang a bigger amount of weights right down inside the wheel. Dropping cog as low as possible. The last 2 pictures show the 2 style of wheels I have designed. The full wheel is a more standard wheel. It has 2 faces. And 6 spacers to join the 2 faces together. Giving a open space of around 44mm. The other wheel is the extram version. It has the spacers removed and pushed down inside the wheel. This gives me around 75mm of space to put a weight hanger in. Giving twice the amount of weight even lower in the wheel. Giving the best cog and tyre weight possible. We don't run any weight in the wheels. As this is the worst type of weight to have. The hangers are fixed to the axles eg the ar60 in my case. 1 1 Quote Link to comment Share on other sites More sharing options...
Hell horn. Posted May 24, 2022 Author Share Posted May 24, 2022 You can see in this pic the most extreme version of the hangers. As you can see the weights are fixed to the axle hub. And then sit right down inside the wheels. And you can see with the car picture how they work. 1 Quote Link to comment Share on other sites More sharing options...


Recommended Posts
Join the conversation
You can post now and register later. If you have an account, sign in now to post with your account.