


Frederik
-
Posts
179 -
Joined
-
Last visited
Recent Profile Visitors


Frederik's Achievements
")


-
My RWD solid axle front engine Escort MK2 build
Frederik replied to Frederik's topic in Scale Crawlers & Replicas
Thanks Nitroholic! Yes I like how it is not too extremely fast! Well I don't really let it build up all available speed from the motor either 😄 I drive it like I don't want to crash it, which is scale driving I guess lol! Yes tail happy that's for sure! Thank you Stormbringer!! It's a blast to be able to drive it and not have anything waiting to be done on it, just driving it! No more tape holding the body hahahah Fred -
My RWD solid axle front engine Escort MK2 build
Frederik replied to Frederik's topic in Scale Crawlers & Replicas
Hey Tom, I'll see what I can do, not sure what is the quick way to correct that. In the meantime here is a slightly better quality video than the previous one, and the first one where the car is actually painted and mostly complete 🙂 I put a bit less torque limit on the ESC (Castle) so now it has more starting power than the last (not filmed) run, but when the power comes in it can go sideways pretty quick! There is also a gyro in this video, helps a bit for the fast slides over this uneven terrain! This is the terrain I like to run, very fine gravel, but there is a bit too much pine needles lol Hope you like it! Fred -
My RWD solid axle front engine Escort MK2 build
Frederik replied to Frederik's topic in Scale Crawlers & Replicas
Then I made some door handles and side mirrors. Actually I made only one mirror lol but please don't tell 😆 Did these actually had mirrors on both sides from factory? https://i.imgur.com/yc2RqXM.jpg [IMG]https://i.imgur.com/o5ZOMdM.jpg[/IMG] [IMG]https://i.imgur.com/paIRaeX.jpg[/IMG] [IMG]https://i.imgur.com/q1U6tEIl.png[/IMG] Yeah figured I needed to do the second mirror 🙂 And that second pics makes me think I need to put just a bit wider hex in the rear and make that wheel a bit closer to the outer edge of the fender. Easy tweak! [IMG]https://i.imgur.com/SUc7uPt.jpg[/IMG] [IMG]https://i.imgur.com/qyY5ePF.jpg[/IMG] And the other new thing, I just bought an RC helicopter project for cheap, and it came with a gyro. Decided to try it on the steering 🙂 Seems like it will work nicely. I put it behind the dash. Also I tried to run the wires as hidden as possible. [IMG]https://i.imgur.com/WlEWL2I.jpg[/IMG] [IMG]https://i.imgur.com/TYTeOxV.jpg[/IMG] [IMG]https://i.imgur.com/KhPmxy9.jpg[/IMG] [IMG]https://i.imgur.com/ctmtd7h.jpg[/IMG] It looks like it reacts nicely, can't wait to try it outside 🙂 -
My RWD solid axle front engine Escort MK2 build
Frederik replied to Frederik's topic in Scale Crawlers & Replicas
Not much new except I adjusted the wheel hexes for proper fender fitment (offset), and snapped better pictures. To me, the new wheels are night and day in final looks compared to either of the previous setups! [img]https://i.imgur.com/TYG5bkc.jpg[/img] [img]https://i.imgur.com/ABot7RJ.jpg[/img] [img]https://i.imgur.com/507zyPb.jpg[/img] [img]https://i.imgur.com/RgjazQE.jpg[/img] [img]https://i.imgur.com/sgn9yAk.jpg[/img] [img]https://i.imgur.com/p0F8m69.jpg[/img] [img]https://i.imgur.com/xB9SMsI.jpg[/img] And a small walkaround video showing the new wheels 🙂 and the newly cracked grille, since I drove it this morning and ran into the kitchen island lol Engine brake is not very good, being only on the rear wheels. Will need to make the front disk project operational! I will see if my son can take a good video of the car running in the living room and post a driving video. It is very nice seeing it run and drift now with the body detailed! -
My RWD solid axle front engine Escort MK2 build
Frederik replied to Frederik's topic in Scale Crawlers & Replicas
So since the overall tire diameter on the 4 spoke was bugging me (quite a lot) but I liked the wheels, I decided to try modding them to fit the smaller Tamiya M tires. Hacked some Fiat Abarth wheels to keep only the ring, and cut another wheel of different model but same construction as the ones I am using, just in case things go bad, did not want to scrap the good wheels... Spoiler alert, it worked 🙂 so I switched to pics of the real wheels because the pics were better 🙂 [IMG]https://i.imgur.com/vnUtmVh.jpg[/IMG] [IMG]https://i.imgur.com/q8mecD7.jpg[/IMG] [IMG]https://i.imgur.com/n0rCleN.jpg[/IMG] [IMG]https://i.imgur.com/dbEAyo9.jpg[/IMG] Placed the wheel center on a drill, using some Ikea kitchen cabinets angle thingy to check for 90 deg angle periodically. Stopped sanding when the insert was fitting just tight enough. [IMG]https://i.imgur.com/cm9X8Yl.jpg[/IMG] [IMG]https://i.imgur.com/VyWP83J.jpg[/IMG] [IMG]https://i.imgur.com/3y1kL9J.jpg[/IMG] Tried a drag racing setup with some bigger Tamiya M chassis truck tires 🙂 just for fun. Meaty :drooler: Neat looks, maybe for another build. [IMG]https://i.imgur.com/9S3rMbi.jpg[/IMG] [IMG]https://i.imgur.com/GeRhjgV.jpg[/IMG] And a comparison of the too large tires before, and the modded wheels with Tamiya 60D M chassis slicks (60mm diameter) [IMG]https://i.imgur.com/tbf2QxB.jpg[/IMG] [IMG]https://i.imgur.com/va8alSZ.jpg[/IMG] [IMG]https://i.imgur.com/9lfTofu.jpg[/IMG] Pretty happy with the result! But the M chassis wheels scales up to 14", not 13" like I would have liked to, but I think I'll have to accept that lol 14" still makes sense for these Escorts, just a bit less classic I guess. 60mm tire diameter scales up to about 22" which also makes sense (it is the diameter Simon McKinley used in the rear on his White MK2, but on 13" wheels though). -
My RWD solid axle front engine Escort MK2 build
Frederik replied to Frederik's topic in Scale Crawlers & Replicas
View of the dash, steering and shifter nicely I think. Seats were out since they are stuck to the battery. And a second pic showing how the clear is not holding good at all on the paint! To make sure it would stick ok with the gorilla glue, I peeled it off, it was very easy, much like a sticker backing lol [IMG]https://i.imgur.com/tVOHj3h.jpg[/IMG] [IMG]https://i.imgur.com/b4IT4T0.jpg[/IMG] So I worked on body mounting some more, found a place to put the magnets, just under a new part, the rear dash lol, not sure about the name, the panel that goes at the base of the rear window. Here are top views before and after, and third pic you can see the 3 thin magnets, they just stick to that steel cross brace. The body is already very snug and just needed something to prevent it from slightly lifting. The panel is glued to the body, and magnets glued to panel: [IMG]https://i.imgur.com/NBI9QJC.jpg[/IMG] [IMG]https://i.imgur.com/zuAzE4k.jpg[/IMG] [IMG]https://i.imgur.com/md07Y81.jpg[/IMG] Now in that last pic you can also see a gaping hole, leading to the trunk. So I wanted to block that like on the actual car so I made another sintra panel for that. [IMG]https://i.imgur.com/dD1oUfh.jpg[/IMG] [IMG]https://i.imgur.com/Cpaf4ip.jpg[/IMG] [IMG]https://i.imgur.com/xTovheE.jpg[/IMG] Also I shortened the shifter a bit, not visible in those pics. Now that the body is mounted, I am nearing completion I think! Some paint to finish up that interior, but I am actually not sure it needs paint since the parts are already the right color (the sanded black dash looks a bit like alcantara), but I might just give a coat of textured black anyway on the dash and seats, and paint the steering wheel. -
My RWD solid axle front engine Escort MK2 build
Frederik replied to Frederik's topic in Scale Crawlers & Replicas
I am tackling on some of the last details now with the dreaded steering wheel... Looking for something proper size and shape, but recently I came across a post here (I will have to find it again for a big thank you to him for giving me the idea!), he just cut a piece of PVC pipe and sanded it to shape. So I picked what looked about the right size at the hardware store (a PVC joint), cut a slice, and started dremeling around: [IMG]https://i.imgur.com/WHCDnhq.jpg[/IMG] [IMG]https://i.imgur.com/Djh2xJB.jpg[/IMG] [IMG]https://i.imgur.com/JORt8je.jpg[/IMG] In retrospective I think it is a bit thick, but I think I'll leave it like that. I made the calculations and since the body is 1:9.3 scale, the steering is an equivalent 310mm (12.25") so it is a smaller steering wheel, yet I was able to find 310mm racing steering wheels, so it is still within reason. It is 1/8" thick also, so that scales out to about 1 5/32" (29.5mm) so it is thick, but I guess that also kind of makes sense. Once the shape was proper I found my reference steering to try and duplicate, and I of course chose the Simon McKinley (RIP) white Escort, the reference pics are from speedhunters article on his car, here is the link: [url]http://www.speedhunters.com/2014/02/warrior-comes-play-maximumattack-escort/[/url] [IMG]https://i.imgur.com/uJEwziK.jpg[/IMG] [IMG]https://i.imgur.com/rcHLZiH.jpg[/IMG] So I started cutting aluminum sheet to shape, not very easy it is so thin! Started with scissors and then I carved it out to final shape with the exacto knife. [IMG]https://i.imgur.com/wJydYGb.jpg[/IMG] [IMG]https://i.imgur.com/z6ITpQP.jpg[/IMG] [IMG]https://i.imgur.com/rAVbxtF.jpg[/IMG] [IMG]https://i.imgur.com/1HLF1SP.jpg[/IMG] [IMG]https://i.imgur.com/ZSLK6BN.jpg[/IMG] I worked on the steering column and shifter. For the steering I used a short piece of steel brake line as a spacer just behind the wheel, and the remaining parts in sintra from a block I already glued together, out of 4 layers of the material. The shifter is done with a guitar string wrapped in shrink tube, and added some kind of ball to it, out of sintra. The shift boot is a section of pull rod boot made for planes and boats. It currently holds there with just a small magnet, not fixed yet, should be glued with the last layer flat against the transmission tunnel so the fitment will be nicer later. The shift knob looks a bit larger than I'd like, again lol but I'm ok with it. That's another case of good enough lol Edit: well looking again at the pics, it is as large as the steering wheel center lol it's way too big. Definitely going to re-do that one lol [IMG]https://i.imgur.com/EfkfezM.jpg[/IMG] [IMG]https://i.imgur.com/EZSi7wN.jpg[/IMG] [IMG]https://i.imgur.com/oKijc51.jpg[/IMG] [IMG]https://i.imgur.com/qT1oi7A.jpg[/IMG] [IMG]https://i.imgur.com/1UsZf2N.jpg[/IMG] [IMG]https://i.imgur.com/w29iKPU.jpg[/IMG] [IMG]https://i.imgur.com/jlyoosz.jpg[/IMG] -
My RWD solid axle front engine Escort MK2 build
Frederik replied to Frederik's topic in Scale Crawlers & Replicas
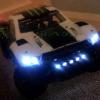
Then I finalized the lights with some warm white LEDs, made a simple harness that can go through the small firewall hole and disconnect from the body in the engine bay. I'm kind of a 1:1 automotive lighting geek, retrofitting projectors in my cars, so I like that it actually has a scale light pattern! It has a cutoff at the right place lol It even has a proper drop at the scale 25ft distance 😆 Only thing is the right headlight is aligned a tad low. [IMG]https://i.imgur.com/heLOTpn.jpg[/IMG] [IMG]https://i.imgur.com/rWsRzRy.jpg[/IMG] [IMG]https://i.imgur.com/Th1TTnc.jpg[/IMG] [IMG]https://i.imgur.com/pk7AMX3.jpg[/IMG] [IMG]https://i.imgur.com/21K63iI.jpg[/IMG] Some aluminum tape inside the car, so it looks more like metal, and also block light from bleeding through 🙂 [IMG]https://i.imgur.com/iD2hZcr.jpg[/IMG] -
My RWD solid axle front engine Escort MK2 build
Frederik replied to Frederik's topic in Scale Crawlers & Replicas
Hey guys sorry I spent so long away from the thread! Thanks James, appreciate the nice words, I'm glad I took the ridiculous amount of time, I like the result! I ended up using a clear that did not stick very well at all... I'll post some updates. I think it might peel of from the rocks hitting it when I run it outside... Thank you buddy! Appreciate it 🙂 So I tried to apply an automotive clear (regular spray can, not 2K type) as I read it was pretty neutral and could probably go without reacting. It did not react, but my problem is when I tried to remove the masking, the clear very easily peeled off from the paint along with the tape... So I had to cut along the tape edge to be able to remove the tape without pealing the clear.. Seems like it just did not stick at all. In retrospective, it seems the paint I used is just about the worst ever. Craft paint with a somewhat powdery texture that likely explain the non-sticking. The only thing maybe is somewhat my fault is I had to sand the paint a bit since the can nozzle sprayed a bunch of dried up paint bits out of the nozzle and onto the body, and after sanding I did not clean it with something wet, I just wiped off the dust. But it was already powdery before sanding.. So I don't know how well it will hold up after fully curing. I doubt it will survive the first gravel encounter, we'll see. Here you see where it peeled of, it did not tear off, it still had a rubber texture and just stretched so I stopped pulling. You can also see along the cut line, cutting with the knife was enough to pull off the clear slightly... [IMG]https://i.imgur.com/BBTGxdW.jpg[/IMG] [IMG]https://i.imgur.com/nGsLBsT.jpg[/IMG] I reattached the bumpers and wing, and snapped a couple pics. Now just need to add the black trim around the windows, and do something about the rear lights too. And put the LED in the lights. And a steering wheel/column too lol [IMG]https://i.imgur.com/CyJc1qs.jpg[/IMG] [IMG]https://i.imgur.com/LAeuk2c.jpg[/IMG] [IMG]https://i.imgur.com/f7pOqQW.jpg[/IMG] -
My RWD solid axle front engine Escort MK2 build
Frederik replied to Frederik's topic in Scale Crawlers & Replicas
Thank you Redback, there is snow here currently so it will be difficult to find a place to run it.. But I am thinking of making some studded tires out of stock tamiya M tires and put a bunch of stitches from inside 🙂 Maybe that would work for some ice run. Because the car is pretty small, and heavy, it tends to have a realistic behaviour, not like any RC car that can easily jump 3 times its height without issues lol But I did actually run it many times but in various states of non-completion lol Can't wait to be able to do a final good video with body finished and all. -
My RWD solid axle front engine Escort MK2 build
Frederik replied to Frederik's topic in Scale Crawlers & Replicas
Not sure why the clear did not stick, I did sand in some places, and did not sand in some other places. It seems like it is the same everywhere, I think it is because the white paint was craft paint (from Michaels craft store) and was very chalky. That paint was definitely a mistake, we'll see how it does when I run it 🙂 Maybe I'll try some other clears on it lol (after peeling it off) So I worked on body mounting some more, found a place to put the magnets, just under a new part, the rear dash lol, not sure about the name, the panel that goes at the base of the rear window. Here are top views before and after, and third pic you can see the 3 thin magnets, they just stick to that steel cross brace. The body is already very snug and just needed something to prevent it from slightly lifting. The panel is glued to the body, and magnets glued to panel: Now in that last pic you can also see a gaping hole, leading to the trunk. So I wanted to block that like on the actual car so I made another sintra panel for that. Also I shortened the shifter a bit, not visible in those pics. Now that the body is mounted, I am nearing completion I think! Some paint to finish up that interior, but I am actually not sure it needs paint since the parts are already the right color (the sanded black dash looks a bit like alcantara), but I might just give a coat of textured black anyway on the dash and seats, and paint the steering wheel. Thanks for looking! Fred -
My RWD solid axle front engine Escort MK2 build
Frederik replied to Frederik's topic in Scale Crawlers & Replicas
I am working on fixing the body now, I put two flat magnets just at the base of the windshield, and also glued the front and back half body together (no screws now). There are still holes in the body, when I drilled them I did not think I would end up focusing that much on scale body! I was mostly on the mechanical part. Not much to show for now, just a quick cool top view! It shows the dash, steering and shifter nicely I think. Seats were out since they are stuck to the battery. And a second pic showing how the clear is not holding good at all on the paint! To make sure it would stick ok with the gorilla glue, I peeled it off, it was very easy, much like a sticker backing lol -
My RWD solid axle front engine Escort MK2 build
Frederik replied to Frederik's topic in Scale Crawlers & Replicas
Now I worked on the steering column and shifter. For the steering I used a short piece of steel brake line as a spacer just behind the wheel, and the remaining parts in sintra from a block I already glued together, out of 4 layers of the material. The shifter is done with a G string (I'm talking about the larger string on a guitar, you perverts. 😆 ) wrapped in shrink tube, and added some kind of ball to it, out of sintra. The shift boot is a section of pull rod boot made for planes and boats. It currently holds there with just a small magnet, not fixed yet, should be glued with the last layer flat against the transmission tunnel so the fitment will be nicer later. The shift knob looks a bit larger than I'd like, again lol but I'm ok with it. That's another case of good enough lol Edit: well looking again at the pics, it is as large as the steering wheel center lol it's way too big. Definitely going to re-do that one lol Now on to a few pics, thanks all for looking! Fred -
My RWD solid axle front engine Escort MK2 build
Frederik replied to Frederik's topic in Scale Crawlers & Replicas
I am tackling on some of the last details now with the dreaded steering wheel... Looking for something proper size and shape, but recently I came across a post here (I will have to find it again for a big thank you to him for giving me the idea!), he just cut a piece of PVC pipe and sanded it to shape. So I picked what looked about the right size at the hardware store (a PVC joint), cut a slice, and started dremeling around: In retrospective I think it is a bit thick, but I think I'll leave it like that. I made the calculations and since the body is 1:9.3 scale, the steering is an equivalent 310mm (12.25") so it is a smaller steering wheel, yet I was able to find 310mm racing steering wheels, so it is still within reason. It is 1/8" thick also, so that scales out to about 1 5/32" (29.5mm) so it is thick, but I guess that also kind of makes sense. Once the shape was proper I found my reference steering to try and duplicate, and I of course chose the Simon McKinley (RIP) white Escort, the reference pics are from speedhunters article on his car, here is the link: [url]http://www.speedhunters.com/2014/02/warrior-comes-play-maximumattack-escort/[/url] So I started cutting aluminum sheet to shape, not very easy it is so thin! Started with scissors and then I carved it out to final shape with the exacto knife. Next will be the steering column, hopefully that will be easier! Also need to think of a shifter, not sure how I'll do this, especially the shift boot. I'll search for reference pics and find the easier type that I like ha! 🙂 Edit: now that I look at it, about the thickness, I should have made it thinner on the lateral dimension, and leave it thicker only in depht.. Fred -
My RWD solid axle front engine Escort MK2 build
Frederik replied to Frederik's topic in Scale Crawlers & Replicas
Small update, I finalized the lights with some warm white LEDs, made a simple harness that can go through the small firewall hole and disconnect from the body in the engine bay. I'm kind of a 1:1 automotive lighting geek, retrofitting projectors in my cars, so I like that it actually has a scale light pattern! It has a cutoff at the right place lol It even has a proper drop at the scale 25ft distance lol! Only thing is the right headlight is aligned a tad low.
